Chevrolet Sonic Repair Manual: Piston, Connecting Rod, and Bearing Installation
Special Tools
EN-470-B Angular Torque Wrench
For equivalent regional tools, refer to Special Tools.
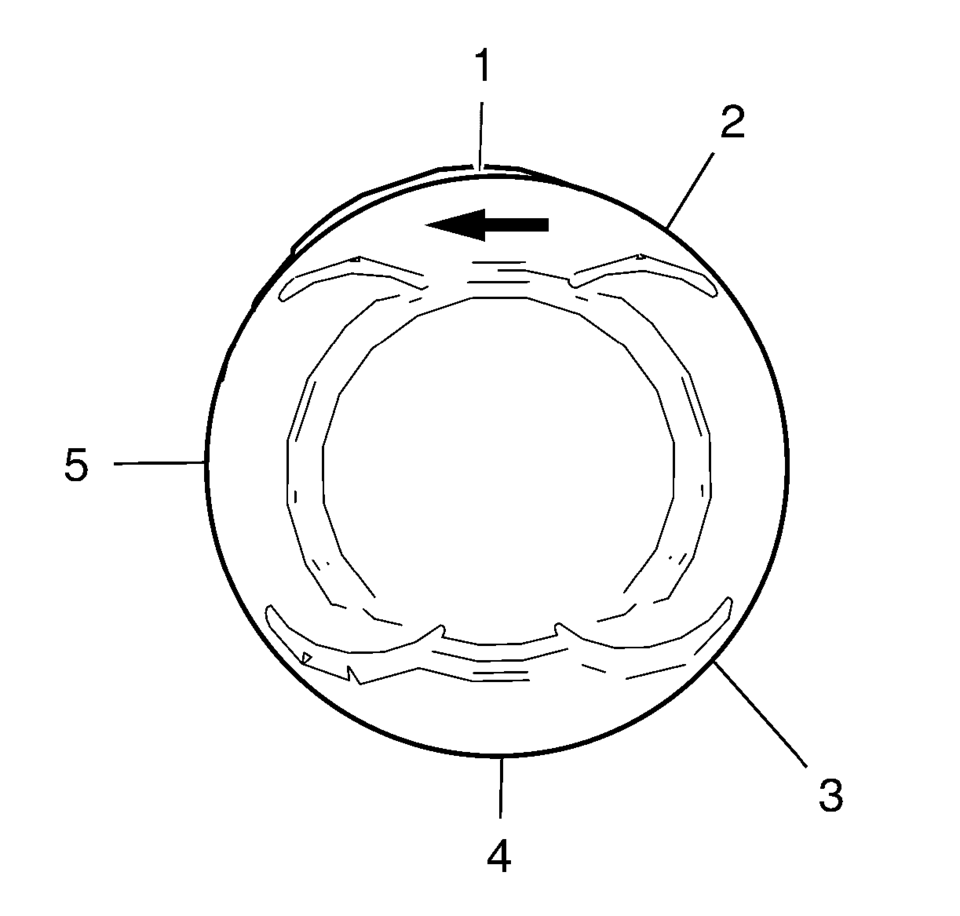
- Adjust the piston ring joints as follows:
- Upper compression ring (1).
- Lower compression ring (4).
- Oil rings (2) or (3).
- Oil ring spacer (5).
- The arrow (1) on the piston head must point to the timing side.
- The markings on the connecting rods (2) must point to the transmission side.
- Install a piston ring compressor to compress the piston rings.
- Install the pistons (1) in along with connecting rods (2) and upper connecting rod bearings (3) to the engine block and to the crankshaft.
- Install the 2 connecting rod bearings and the 2 connecting rod bearing caps (2) of cylinder 1 and 4.
- Install the 4 NEW connecting rod bearing cap bolts (1) and tighten in the following sequence:
- Tighten the connecting rod bearing cap bolts to 25 Y (18 lb ft)
.
- Tighten the connecting rod bearing cap bolts an additional 45 degrees. Use EN-470 B wrench.
- Rotate the crankshaft 180 degrees.
- Install the 2 connecting rod bearings and the 2 connecting rod bearing caps (2) of cylinder 3 and 2.
- Install the 4 NEW connecting rod bearing cap bolts (1) and tighten in the following sequence:
- Tighten the connecting rod bearing cap bolts to 25 Y (18 lb ft)
.
- Tighten the connecting rod bearing cap bolts an additional 45 degrees. Use EN-470–B wrench.


Note:
The flarings (arrows) on the connecting rod bearing caps must point to the transmission side. The connecting rod bearing caps must be installed in their original position.
Caution:
Refer to Fastener Caution.
Caution:
Refer to Torque-to-Yield Fastener Caution.
Note:
Do not reuse the old bolts.

Note:
The flarings (arrows) on the connecting rod bearing caps must point to the transmission side. The connecting rod bearing caps must be installed in their original position.
Note:
Do not reuse the old bolts.
 Piston, Connecting Rod, and Bearing Cleaning and Inspection
Special Tools
EN-470-B Angular Torque Wrench
For equivalent regional tools, refer to Special Tools.
Visual Inspection And Cleaning Procedure
Connecting Rod
Warning: Wear safety gla ...
 Piston, Connecting Rod, and Bearing Removal
Install the crankshaft balancer bolt.
Set the pistons 1 and 4 to TDC in direction of engine rotation.
Note: Note cylinder sequence.
Mark the connecting rod with the ...
Other materials:
Tire Pressure
Tires need the correct amount of air pressure to operate effectively.
Caution
Neither tire underinflation nor overinflation is good. Underinflated tires,
or tires that do not have enough air, can result in:
. Tire overloading and overheating which could lead to a blowout.
. Premature or ir ...
Engine Cover Replacement
Engine Cover Replacement
Callout
Component Name
1
Engine Cover
Procedure
Use a suitable tool to first unclip the front of the cover, then rotate
the cover backward and pull upward to remove.
...
Driver or Passenger Seat Shoulder Belt Replacement (with A69)
Driver or Passenger Seat Shoulder Belt Replacement
Callout
Component Name
Warning: Refer to SIR Warning.
Warning: Refer to SIR Inflator Module Handling and Storage
Warning.
Warning: Refer to SIR ...

0.0069