Chevrolet Sonic Owner's Manual: Reclining Seatbacks
Warning
If either seatback is not locked, it could move forward in a sudden stop or crash. That could cause injury to the person sitting there. Always push and pull on the seatbacks to be sure they are locked.
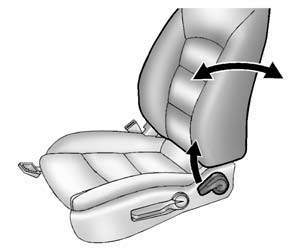
To recline a manual seatback:
1. Lift the lever.
If necessary, move the safety belt out of the way to access the lever.
2. Move the seatback to the desired position, and then release the lever to lock the seatback in place.
3. Push and pull on the seatback to make sure it is locked in place.
To return the seatback to the upright position:
1. Lift the lever fully without applying pressure to the seatback, and the seatback will return to the upright position.
2. Push and pull on the seatback to make sure it is locked.
Warning
Sitting in a reclined position when the vehicle is in motion can be dangerous. Even when buckled up, the safety belts cannot do their job.
The shoulder belt will not be against your body. Instead, it will be in front of you. In a crash, you could go into it, receiving neck or other injuries.
The lap belt could go up over your abdomen. The belt forces would be there, not at your pelvic bones. This could cause serious internal injuries.
For proper protection when the vehicle is in motion, have the seatback upright. Then sit well back in the seat and wear the safety belt properly.
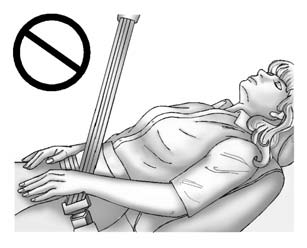
Do not have a seatback reclined if the vehicle is moving.
 Seat Adjustment
Manual Seats
Warning
You can lose control of the vehicle if you try to adjust a driver seat while
the vehicle is moving. Adjust the driver seat only when the vehicle is not moving.
To adjust a ...
 Front Seat Armrest
There is an armrest on the inboard side of the driver seat. To raise or lower
the armrest, push up or pull down on the armrest. ...
Other materials:
Certification Label
Label Example
A vehicle-specific Certification label is attached to the vehicle's center pillar
(B-pillar). The label tells the gross weight capacity of the vehicle, called the
Gross Vehicle Weight Rating (GVWR). The GVWR includes the weight of the vehicle,
all occupants, fuel, and carg ...
Tire Rotation
Tires should be rotated every 12 000 km (7,500 mi). See Maintenance Schedule.
Tires are rotated to achieve a uniform wear for all tires. The first rotation
is the most important.
Anytime unusual wear is noticed, rotate the tires as soon as possible, check
for proper tire inflation pressure, an ...
Synchronizers Disassemble
1st/2nd Gear Synchronizer
iv
Note: When servicing the synchronizers, retain them in the
same order that they are removed. Keep the synchronizer components together
and mark them to identify correct location.
Remove the 1st/2nd gear synchronizer hub ...

0.0121