Chevrolet Sonic Repair Manual: Transmission Disassemble (Gen 1)
Special Tools
- 3-9506289 Universal Adapter
- R-0007758 Holding Fixture
- S-9407198 Differential Bearing Race Wrench
For equivalent regional tools, refer to Special Tools.
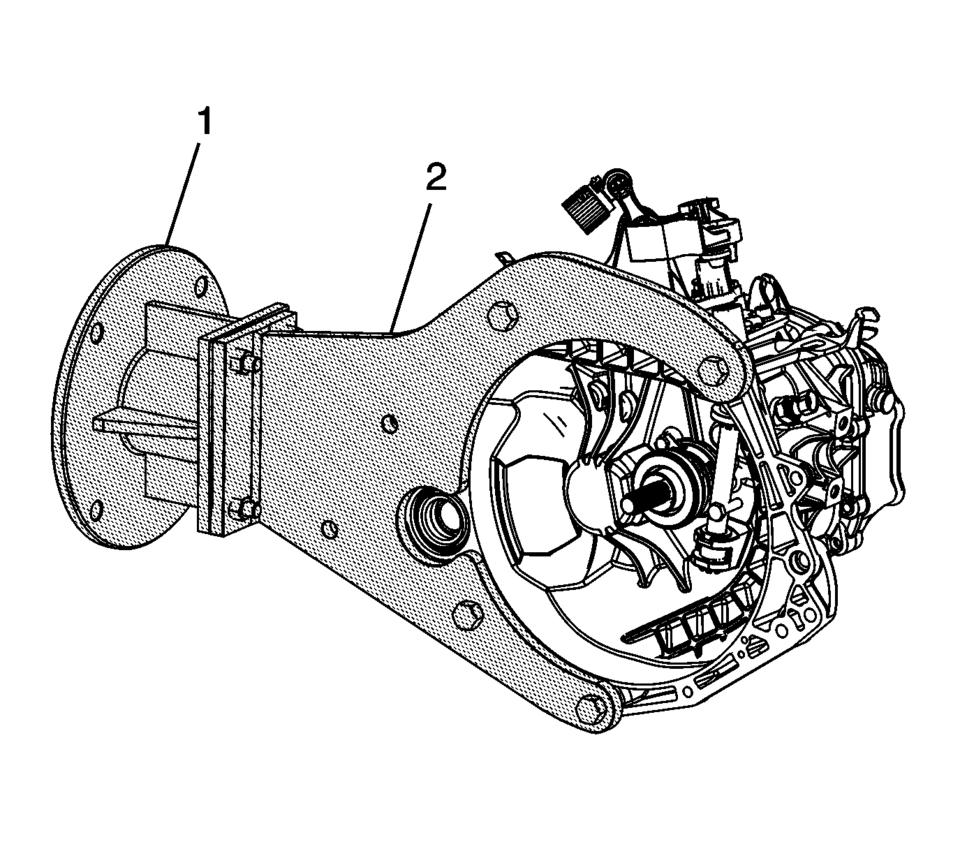
- Attach R-0007758 holding fixture (2) to the transmission.
- Attach R-0007758 holding fixture (2) with transmission to the 3-9506289 Universal Adapter (1).
- Remove the clutch release bearing (1).
- Remove the clutch fork shaft retaining bolt (2).
- Remove the clutch fork shaft (1).
- Remove the transmission control lever housing bolts (1).
- Remove the control lever housing (2) and gasket (3).
- Remove the transmission cover bolts (3).
- Remove the transmission cover (2) and gasket (1).
- Remove the back up lamp switch (1).
- Remove the transmission case bolts (3).
- Remove the transmission case (2) and gasket (1).
- Remove the case magnet (4), may stay with case.
- Remove the reverse idler gear washer (5), may stay on the reverse idler gear shaft.
- Mark the differential bearing adjuster and case (1) before removal.
- Remove the differential bearing adjuster lock bolt (1).
- Remove the differential bearing adjuster lock (2).
- Using S-9407198 differential bearing race wrench remove the front differential bearing adjuster (1).
- Remove the front differential bearing retainer O-ring seal (2).
- Remove the front differential carrier cover bolts (1).
- Remove the differential carrier cover (2) and gasket (3).
- Remove the front differential carrier (1).


 Transmission Component and System Description
The mechanical components of the 6T30/40/45/50 are as follows:
A torque converter with an electronically controlled capacity clutch (ECCC)
Gear-type fluid pump assembly
1??? and low ...
 Transmission Disassemble (Gen 2)
Special Tools
3-9506289 Universal Adapter
R-0007758 Holding Fixture
S-9407198 Differential Bearing Race Wrench
For equivalent regional tools, refer to Special Tools.
Attach R-0 ...
Other materials:
Windows
Manual Windows
If equipped, use the window crank to open and close each window.
See Manual Windows.
Power Windows
If equipped, press the switch down to open the window. Pull the front of the
switch up to close it.
The switches work when the vehicle is in ON/RUN or ACC/ ACCESSORY, or when Re ...
Floor Rear Air Outlet Duct Replacement - Right Side
Floor Rear Air Outlet Duct Replacement - Right Side
Callout
Component Name
Preliminary Procedure
Remove the front floor carpet. Refer to Floor Panel Carpet Replacement.
1
Floor Rear Air Outlet Du ...
Synchronizers Cleaning and Inspection
Note: When servicing the synchronizers, retain them in the order
that they are removed. Mark the parts to ensure the correct position for
inspection and assembly.
Clean all the synchronizer parts in a suitable cleaning
solvent and air dry all the parts.
Inspect the 1 ...

0.0106