Chevrolet Sonic Repair Manual: Camshaft Timing Chain Adjustment
Special Tools
- EN-952 Fixing Pin
- EN-953–A Fixing Tool
- EN-49977?E00 Fixation Sensor Discs
For equivalent regional tools, refer to Special Tools.
- Remove the ignition coil. Refer to Ignition Coil Replacement.
- Remove the camshaft cover. Refer to Camshaft Cover Replacement.
- Remove the camshaft position actuator solenoid valves. Refer to Camshaft Position Actuator Solenoid Valve Replacement.
- Remove the right front wheelhouse liner. Refer to Front Wheelhouse Liner Replacement.
- Rotate the engine clockwise until the bore (2) in the crankshaft balancer aligns with the mark (1) on the engine front cover.
- Remove the crankshaft bearing cap tie plate hole plug (2) and the seal ring (1).
- Install the EN-952 fixing pin (1) to hold the crankshaft in TDC position.
- Loosen the intake camshaft sprocket bolt (2) while holding the hexagon of the intake camshaft with a wrench (1) until the camshaft position exciter wheel is clearly rotatable.
- Loosen the exhaust camshaft sprocket bolt while holding the hexagon of the exhaust camshaft with a wrench until the camshaft position exciter wheel is clearly rotatable.
- Adjust the camshafts so that the EN-953–A fixing tool (1) can be installed.
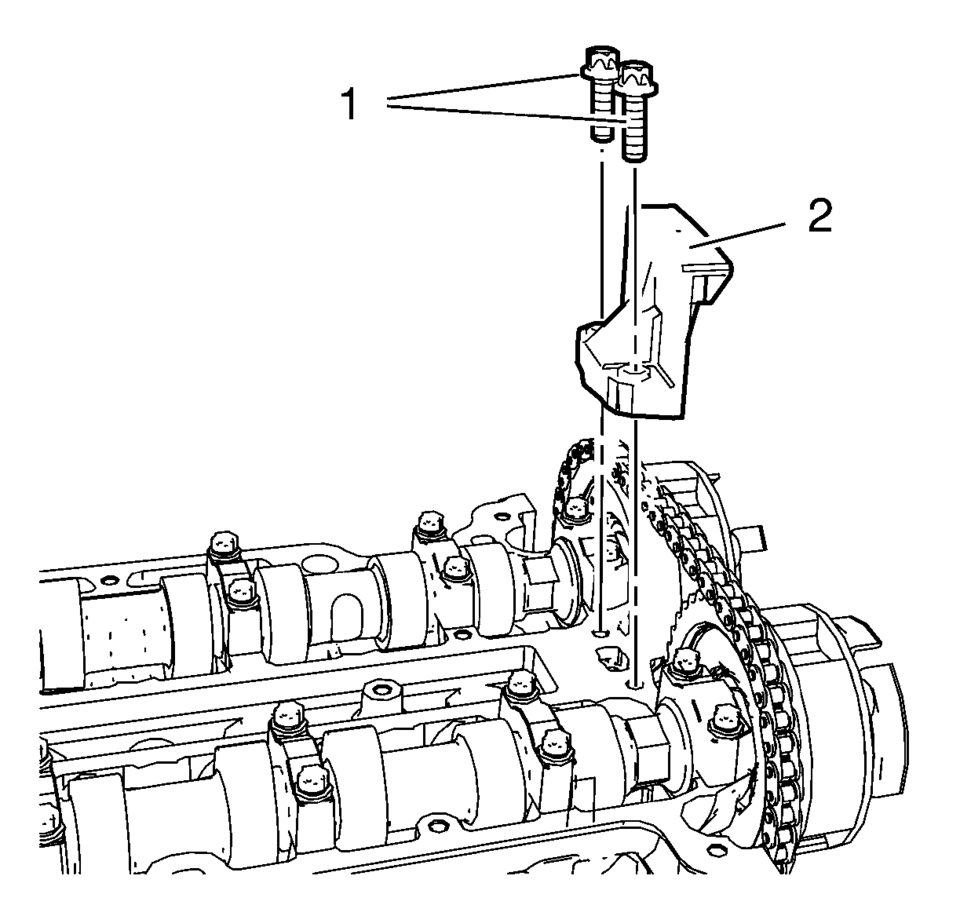
- Remove the 2 upper timing chain guide bolts (1).
- Remove the upper timing chain guide (2).
- Install the EN-49977?E00 fixing tool (2) and adjust the gearing of the fixing tool so it engages with the intake camshaft sprocket gearing (1).
- Tighten the 2 fastening bolts (1) of the EN-49977?E00 fixing tool while pushing the fixing tool in direction of the arrow.
- Tighten the adjuster bolt (2).
- Install the EN-49977?E00 fixation (2) to find and hold the camshaft position exciter wheels in the correct position.
- Tighten the 2 fastening bolts (6) of the EN-49977?E00 fixation .
- Tighten the intake camshaft sprocket bolt (4) while holding the hexagon (1)
of the intake camshaft to 50 Y (37 lb ft)
.
- Tighten the intake camshaft sprocket bolt (4) while holding the hexagon (1)
of the intake camshaft an additional 60°
.
- Tighten the exhaust camshaft sprocket bolt while holding the hexagon of
the exhaust camshaft to 50 Y (37 lb ft)
.
- Tighten the exhaust camshaft sprocket bolt while holding the hexagon of
the exhaust camshaft an additional 60°
.
- Remove the EN-49977?E00 fixation and the EN-49977?E00 fixing tool .
- Install the upper timing chain guide (2).
- Install the 2 upper timing chain guide bolts (1) and tighten to 8 Y (71 lb in)
.
- Remove the EN-953–A fixing tool .
- Remove the EN-952 fixing pin .
- Rotate the crankshaft for 720°
and check the engine timing again. Repeat the adjustment procedure if necessary.
- Install the crankshaft bearing cap tie plate hole plug and seal ring and
tighten to 40 Y (30 lb ft)
.
- Install the right front wheelhouse liner. Refer to Front Wheelhouse Liner Replacement
- Install the camshaft position actuator solenoid valves. Refer to Camshaft Position Actuator Solenoid Valve Replacement.
- Install the camshaft cover. Refer to Camshaft Cover Replacement.
- Install the ignition coil. Refer to Ignition Coil Replacement.


Caution:
To ensure proper crankshaft top dead center (TDC) alignment, the retention pin should fit easily through the bore in the crankshaft tie plate and into the crankshaft. Binding of the retention pin could affect proper engine timing.


Note:
The fixing tool should be installed completely to both camshaft grooves without high effort.

Note:
Push the fixing tool in the direction of the arrow to ensure it engages without clearance.


Note:
A wrong installation position is possible. Make sure that the fixation tool is installed without clearance to the cylinder head in areas (3) and (5).
Caution:
Refer to Fastener Caution.

 Camshaft Timing Chain Inspection
Special Tools
EN-952 Fixing Pin
EN-953-A Fixing Tool
EN-49977-100 Transmitter Disc Fixation
For equivalent regional tools, refer to Special Tools.
Remove the ignition coil. Refer to I ...
Other materials:
Brake Pressure Modulator Valve Bracket Replacement
Removal Procedure
Remove the brake pressure modulator valve (BPMV) and bracket assembly.
Refer to Brake Pressure Modulator Valve Replacement.
Remove the BPMV bolts (1).
Remove the BPMV bracket.
Installation Procedure
Install the BPMV br ...
Fuel Tank Filler Pipe Replacement
Removal Procedure
Remove the bracket fastener (1).
Lift and support the vehicle. Refer to
Lifting and Jacking the Vehicle.
Remove the fuel tank filler pipe bracket fastener (1).
Disconnect the vent hose (2). Refer to
Plastic Collar ...
Clutch Pedal Position Sensor Replacement
Removal Procedure
Remove the instrument panel lower trim pad cover.
Refer to Instrument Panel Lower Trim Pad Cover Replacement.
Remove the clutch pedal position sensor bolt (2).
Remove the clutch pedal position sensor (1).
Disconnect the clu ...

0.0112