Chevrolet Sonic Repair Manual: Piston, Connecting Rod, and Bearing Installation
Special Tools
EN-470-B Angular Torque Wrench
For equivalent regional tools, refer to Special Tools.
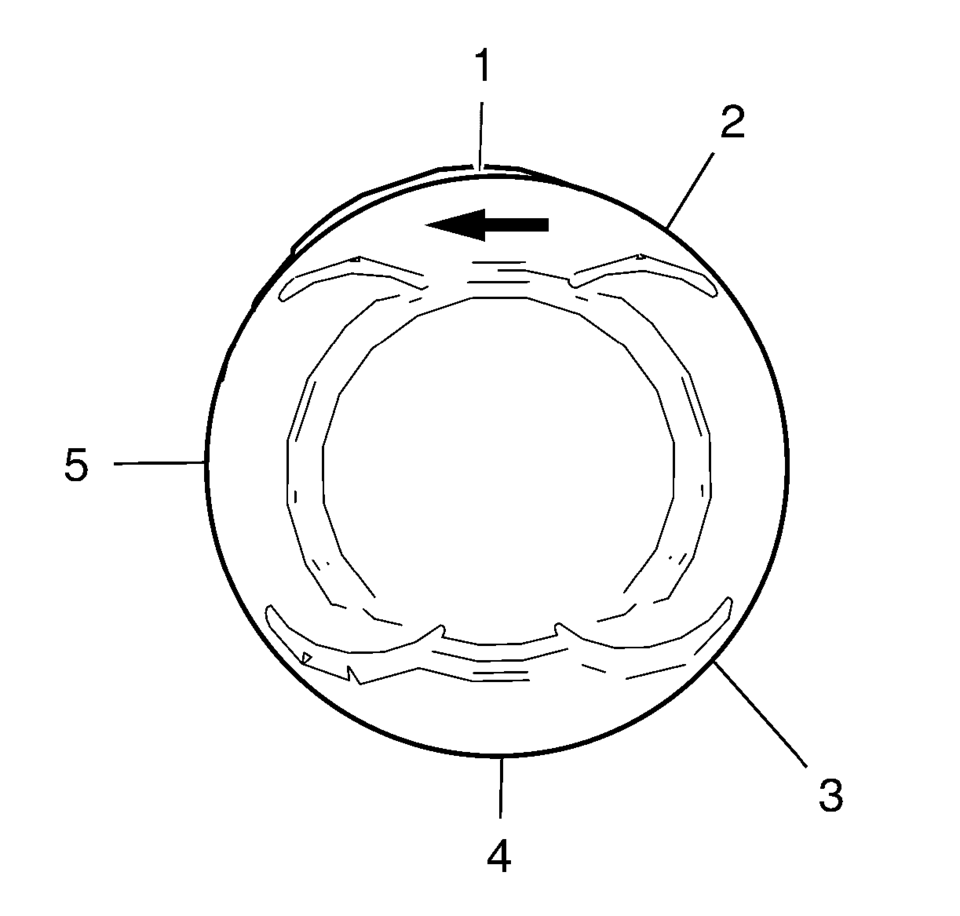
- Adjust the piston ring joints as follows:
- Upper compression ring (1).
- Lower compression ring (4).
- Oil rings (2) or (3).
- Oil ring spacer (5).
- The arrow (1) on the piston head must point to the timing side.
- The markings on the connecting rods (2) must point to the transmission side.
- Install a piston ring compressor to compress the piston rings.
- Install the pistons (1) in along with connecting rods (2) and upper connecting rod bearings (3) to the engine block and to the crankshaft.
- Install the 2 connecting rod bearings and the 2 connecting rod bearing caps (2) of cylinder 1 and 4.
- Install the 4 NEW connecting rod bearing cap bolts (1) and tighten in the following sequence:
- Tighten the connecting rod bearing cap bolts to 25 Y (18 lb ft)
.
- Tighten the connecting rod bearing cap bolts an additional 45 degrees. Use EN-470 B wrench.
- Rotate the crankshaft 180 degrees.
- Install the 2 connecting rod bearings and the 2 connecting rod bearing caps (2) of cylinder 3 and 2.
- Install the 4 NEW connecting rod bearing cap bolts (1) and tighten in the following sequence:
- Tighten the connecting rod bearing cap bolts to 25 Y (18 lb ft)
.
- Tighten the connecting rod bearing cap bolts an additional 45 degrees. Use EN-470–B wrench.


Note:
The flarings (arrows) on the connecting rod bearing caps must point to the transmission side. The connecting rod bearing caps must be installed in their original position.
Caution:
Refer to Fastener Caution.
Caution:
Refer to Torque-to-Yield Fastener Caution.
Note:
Do not reuse the old bolts.

Note:
The flarings (arrows) on the connecting rod bearing caps must point to the transmission side. The connecting rod bearing caps must be installed in their original position.
Note:
Do not reuse the old bolts.
 Piston, Connecting Rod, and Bearing Cleaning and Inspection
Special Tools
EN-470-B Angular Torque Wrench
For equivalent regional tools, refer to Special Tools.
Visual Inspection And Cleaning Procedure
Connecting Rod
Warning: Wear safety gla ...
 Piston, Connecting Rod, and Bearing Removal
Install the crankshaft balancer bolt.
Set the pistons 1 and 4 to TDC in direction of engine rotation.
Note: Note cylinder sequence.
Mark the connecting rod with the ...
Other materials:
Finish Care
Application of aftermarket clearcoat sealant/wax materials is not recommended.
If painted surfaces are damaged, see your dealer to have the damage assessed and
repaired. Foreign materials such as calcium chloride and other salts, ice melting
agents, road oil and tar, tree sap, bird droppings, ...
Headlamp Replacement
Headlamp Replacement
Callout
Component Name
Preliminary Procedure
Remove the front bumper fascia. Refer to Front Bumper Fascia Replacement.
1
Headlamp Assembly Screw (Qty:?€‰4)
Cautio ...
Camshaft Intake and Exhaust Sprocket Replacement
Special Tools
EN-955-A Locking Pin
For equivalent regional tools, refer to Special Tools.
Removal Procedure
Remove the air cleaner assembly. Refer to Air Cleaner Assembly Replacement.
Remove the camshaft cover. Refer to Camshaft Cover Replacement.
Remove both camshaft p ...

0.0099