Chevrolet Sonic Repair Manual: Clutch and Differential Housing Assemble
Special Tools
- R-0007761 Universal Handle for Pullers and Installers
- R-0407009 Countershaft Front Bearing Driver
- R-0407010 Input Shaft Needle Bearing Puller and Driver
- R-0407014 Gearshift Device Bushing Driver ?E#8201;Use with R-0007761
- S-9707500 Axle Shaft Seal Installer
For equivalent regional tools, refer to Special Tools.
- Install the shift shaft bushings (3) using the R-0407014 bushing driver (2) and R-0007761 handle (1).
- Install the main shaft front bearing assembly (3) using the R-0407009 driver (2) and the R-0007761 handle (1).
- Install the input shaft front bearing assembly (3) using the R-0407010 driver (2) and the R-0007761 handle (1).
- Install the clutch yoke shaft bushings (1).
- Install the clutch release bearing collar seal (3).
- Install the clutch release bearing collar (2).
- Install the clutch release bearing collar bolt (1) and tighten to 5 Y
(44.3 lb in)
.
- Install the front wheel drive shaft oil seal assembly (3) using the S-9707500 seal installer (2) and the R-0007761 handle (1).
- Install the transmission magnet (1). Tighten to 4 Y (35.4 lb in) plus
45° plus an additional 90°
.
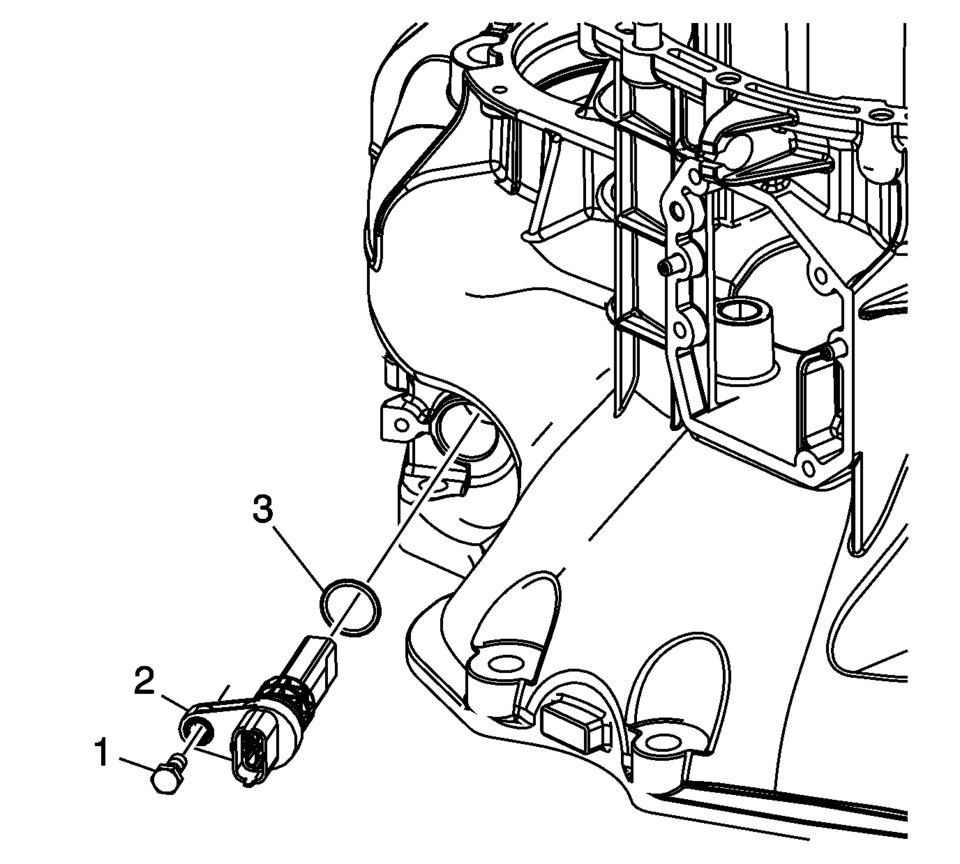
- Install the NEW vehicle speed sensor O-ring seal (3).
- Install the vehicle speed sensor assembly (2).
- Install the vehicle speed sensor bolt (1). Tighten to 5 Y (44 lb in)
.


Note:
Align the tabs on the clutch yoke shaft bushings to the slots in the clutch and differential housing.

Caution:
Refer to Fastener Caution.


 Differential Case Disassemble
Special Tools
6-9607346 Sensor Ring Gear Puller
J-810704 Steering Column Center Bar Puller
J-810721 Axle Shaft Seal Remover Support Base
R-0006749 Support Base
R-0407011 Bearing Race Rem ...
 Clutch and Differential Housing Cleaning and Inspection
Warning: Wear safety glasses to avoid injury when using compressed
air or any cleaning solvent. Bodily injury may occur if fumes are inhaled
or if skin is exposed to chemicals.
...
Other materials:
Brakes
If the overheat warning no longer displays, the vehicle can be driven. Continue
to drive the vehicle slowly for about 10 minutes. Keep a safe vehicle distance from
the vehicle in front. If the warning does not come back on, continue to drive normally
and have the cooling system checked for pro ...
Customer Satisfaction Procedure
Your satisfaction and goodwill are important to your dealer and to Chevrolet.
Normally, any concerns with the sales transaction or the operation of the vehicle
will be resolved by your dealer's sales or service departments. Sometimes, however,
despite the best intentions of all concerned, ...
Hood Rear Weatherstrip Replacement
in
Hood Rear Weatherstrip Replacement
Callout
Component Name
1
Hood Rear Weatherstrip
Procedure
The hood rear weatherstrip is held in place with 10?€‰plastic retainers
that are part of the air inlet grille. ...

0.012